**Heads up: This post contains affiliate links. As an Amazon Associate, I earn from qualifying purchases. Meaning I may receive a small commission– at no cost to you, of course– were you to make a purchase through any of the links. If I link to a product, I use it, I love it, and I think you would too! Please see my Privacy Policy for more details.
Rust Removal & Prevention, Aging Metal with Vinegar, plus Which Primer Works Best for That?
With all of the research I’ve been doing on wood types recently, it doesn’t surprise me that the universe throws me 4 new projects made almost completely in metal! (That’s just my luck) Cast Iron, aluminum, and stainless steel to be exact.
This was a new area for me… but, honestly, I love learning new things the most!
I made a couple of mistakes – including having to completely redo one of my projects due to the paint not sticking correctly.
But after completing these past few projects, I feel confident to share the do’s and don’ts of metal furniture refinishing and restoration.

Skip ahead to learn How-To Create this Rustic Farmhouse Distressed Paint Look on Metal:

3 Things You Should Learn About Before Painting, Restoring or Refinishing a Metal Piece:
Rust Removal & Prevention
Distressing Metal Without Paint
Making Sure Your Paint Sticks to the Metal
Rust Removal & Prevention While Restoring Metal Furniture
If you plan to restore a metal furniture piece that has any years of age on it, you will most likely come across rust. Rust is a reddish-brown coating that occurs when iron or steel is exposed to air or moisture for extended periods of time.
Depending on the severity of the rust on your metal piece, removal is usually, quite simple.
How-To Clean Rust From Metal Furniture
Less severe rust areas can be removed using a wire brush, and steel wool. Scrub the area thoroughly down to the bare metal. Be sure to remove ALL rust, or it will return regardless of the precautions you use from this point.
For more severe cases that can’t easily be scrubbed off, you can spray the area down with white vinegar, or if the object is small enough, submerge it completely in white vinegar for about 30 minutes.
You may also want to dust baking soda over the spots wet with vinegar. Let that sit for at least 30 minutes (the longer the better). Then proceed with the wire brush or steel wool scrubbing.
No matter what, some scrubbing will be involved.
Small circular motions with steel wool are the way to go. “Wax on, wax off?”
Severe rust may even eat away at the metal causing holes in your furniture. These cases are a bit trickier.

Filling Rust Holes in Metal Furniture with Bondo (Also Works For Wood Filler)
After you remove all evidence of rust on your piece with the methods above, you can fill any holes left behind with Bondo Body Filler.
Bondo hardens to the strength of metal, (or wood) and is non-shrinking meaning it works perfectly for rust repairs! You can continue to paint right over it as usual once it’s completely dry and smoothed to match.
Before applying the Bondo, sand down the area with 80-grit sandpaper to give it something to stick to.
Larger Holes Will Need Nylon Screen For a Backer to Attach Bondo To
It doesn’t have to be perfect, just a small piece of screen shoved into the hole that the Bondo can grab and use as a backer. You may want to use epoxy to ensure it sticks to the metal as well.
Following the directions on the Bondo packaging, mix the filler and hardener on a piece of cardboard. Use a piece of hard plastic to spread the Bondo onto the piece.
Spread it evenly over the nylon screening, pushing it through the hole and smoothing on both sides. Try to make it as smooth as possible, but you will be sanding it down once it’s dry.
Wait until it is completely hardened, then work your way through sanding grits until it is completely smooth and matches your piece.
You should be able to prime and paint this area along with the rest of your piece from there!
This technique works great for wood furniture repairs as well! I’ll be sharing a post soon with more details on using Bondo as a wood filler for wood furniture repairs.
Now to discuss the exact opposite of rust removal from metal.
My next metal project had me wondering how to CREATE rust and age on a perfectly clean piece of metal.
I know, I know. Why on earth would I want to do this? I was going for a rusted farmhouse look on the Milk Jug Kitchen Canisters. I’ll go into that later.
Sometimes paint just isn’t enough to create the full effect, ya know?
Aging and Distressing Metal Without Paint
I found it quite amusing that in order to create rust and age on a piece, I needed the same ingredient I used to REMOVE rust last time!
White Vinegar. What else, right?
First, rough up the surface of the metal with some fine sandpaper, or steel wool. If the metal was shiny, you want to remove as much shine as possible before applying your vinegar.
This time, you want white vinegar and salt. I used a spray bottle, but if your piece is small enough you can submerge it in vinegar, or soak paper towels, or cloths in vinegar and cover it that way.
Mix 1 part water with 3 parts vinegar, and add at least 2 tablespoons of salt per 8oz. of the mixture. You will need to repeat the process several times throughout the day.
Try working in the sunshine if possible, it will help move the oxidizing along.
Lay the objects flat, on a side that will allow the mixture to set on the metal for a while and not run down it. Then spin them and spray again, a couple of hours later.
By the end of the day, I opted for spraying the canisters, then laying soaked towels over them as well to keep the vinegar on them for as long as possible.

You will begin to see the rust forming. Try not to rub off what is forming while reapplying. Just let it harden and you can sand off any excess after.
Leave the piece to dry through the next day in the sun as well, after removing cloths, etc. It should harden to close to permanent by then.
If you don’t achieve the rusty outcome you were hoping for, try topping it with some paint.
Either watered down or dry-brushed over the rusty-looking areas; brown or copper paint will help bring out the rust if you need more.
Then seal it in with some polyurethane and voila! Beautiful rusty metal, a thing of beauty!
Not sure what dry-brushing is? Check my Distressing Techniques post for more.
Always Apply Primer to Metal Before Painting
As I said earlier, I made a pretty big mistake on one of my metal projects causing me to pretty much completely redo a paint job with quite a few steps, unfortunately.
Not a mistake I will make again that’s for sure. Hopefully, by reading this, you can assure you won’t have to go through the same, painstaking mistake!
Not all primers are equal when it comes to metal.
I was under the impression any old primer would work fine for metal when I started my first project. Boy was I wrong!
I learned, that basically if you’re stripping the old paint off of something metal, you want to get a self-etching primer and use it immediately after all paint has been removed.
Otherwise, flash rust can occur when the air hits the metal suddenly.
Acid and zinc make the self-etching primer different from normal primers. The acid burns into the metal, and the zinc seals it. This then creates a perfect surface for paint applications that will hold strong for the long run.
If You Aren’t Removing The Old Paint Completely, Go For Rust Preventative Primers
Krylon’s Rust Preventative Primer is perfect for painted surfaces with light rust you’ve removed previously.
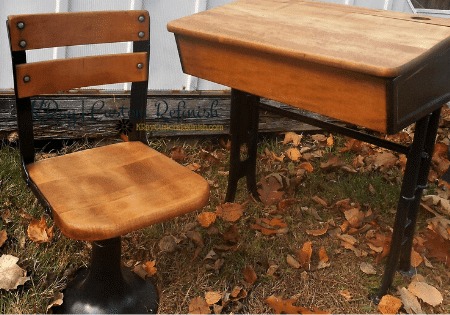
I chose to use this on the Cast Iron School Desk I restored recently. The paint was in decent shape on the bottom of the desk, so I chose to prime it and paint instead of completely stripping it.

To skip rust removal altogether go for Rustoleum Stop Rust Rusty Metal Primer – although you will still do some scrubbing either way as I said earlier.
For help figuring out which primer to use for what- check out my free printable primer chart (it covers wood and plastic applications as well!)

Just sign-up below for access to that free download and many more!
No Matter What – If You’re Painting Metal – Use a Primer!
Otherwise, you’ll find yourself on the last step of your project noticing paint chipping off like nothing… and feel like a dope (me).

Above – (Left) Without Primer (Right) Redone with correct primer.
I think I got it close the second time, but I lost a lot of the rust look in the removal of the first paint job, unfortunately.
Either way, they sold quickly but I definitely lost a lot of time by not priming correctly. So, be sure to use the right primer!
How-To Create the Distressed Paint Look on Metal
Time Needed : 24 hours 000 minutes
How-To Create the Distressed Paint Look on Metal
First, sand down your metal piece lightly with sandpaper
Wipe off dust with a clean, dry cloth.
Apply your first coat of primer.
As I said earlier, be sure to use the correct primer for the type of metal you’re working with.
After drying, apply your choice of base coat over the entire piece
Choose a color you want to be less prominent on the piece as it will basically be covered by the rest of your colors by the end of this.
After the base has dried for the appropriate time, dry brush your 2nd color lightly over it in random areas.
I’d recommend one of the lighter colors you’ve chosen for the 2nd color.

Without waiting for complete dry time, choose your 3rd color and again drybrush it on randomly over the piece.
Fill in areas that are still only base coat.
Continue this with as many colors as you see fit for your piece.
I used 3 colors on my canisters at this point: rose gold, toasted marshmallow, and silver lining.
Depending on your color choices, choose a paint color to blend all of your dry brushings together in a color wash. (I chose silver lining and gray 50/50 mix)
Add water to this paint color in a 1:3 mixture. (1 part paint to 3 parts water)
After all dry brushings have dried, lightly cover the entire piece with the color wash.
Be sure to catch any drips, and blend everything together as evenly as possible. Let this dry for at least an hour.
Choose your final accent color for a heavy dry brush over the entire piece.
I chose a cabana stripe green for a patina look.

Finally, another quick dry brush with your 2nd paint color lightly over random spots.
Let dry overnight.
Finish with 2 Coats of Polyurethane with 0000 steel wool between coats.
You can also use wax for a topcoat. Or create a wax glaze with mineral spirits. Learn how here.

Tools
- Chip Brush
- Paint Brush
Materials
- Metal Primer
- 3+ Paint Colors
- Polyurethane
- 0000 Steel Wool

One last thing before I finish this Metal Furniture Refinishing post (which, I apologize, is extremely unorganized):
How To Clean Brass with Vinegar, Salt, & Flour
The Cast Iron Bed Frame I recently added to my shop page included beautiful brass balls on its posts. They were in pretty rough condition, so I used one of my favorite at-home methods to clean them up a bit.
All ingredients needed are items you should already have in your home:
1- Flour
2- Salt
3- Vinegar
Mix about half a cup of vinegar with a teaspoon of salt. Then add flour to thicken the mixture to a paste.
Rub the paste onto your brass piece, and leave it for about 10 minutes.

Then rinse off the paste with warm water and buff the brass with a lint-free rag.
Any prior tarnish should disappear close to complete with this amazing method.
Now go tackle your own metal furniture project!
I hope I’ve covered the basics here for you on your project. Please feel free to contact me with any questions at all!
I would love to see how your projects come out, post some pics in the comment section below 🙂

Until Next Time,
KRay


