Queen Ann Side Table Marble Faux Finish Makeover
Hello everyone 🙂 It has been a bit! I am so happy to be back to refinishing furniture after a long Summer dedicated to finishing my eBook, and enjoying my daughter on her last Summer before Kindergarten 🙁 But my book is done, and my little one, Alice, is at (and loving) full-time Kindergarten! Meaning Mommy finally gets her “me” time. Painting furniture!! Yay!
I’ve finally gotten a few projects done, and I’ll be sharing each of them with you over the next few weeks. The first is the lovely Queen Ann Side Table Drawer with Faux Marble Finished top and drawer front. It’s gorgeous!
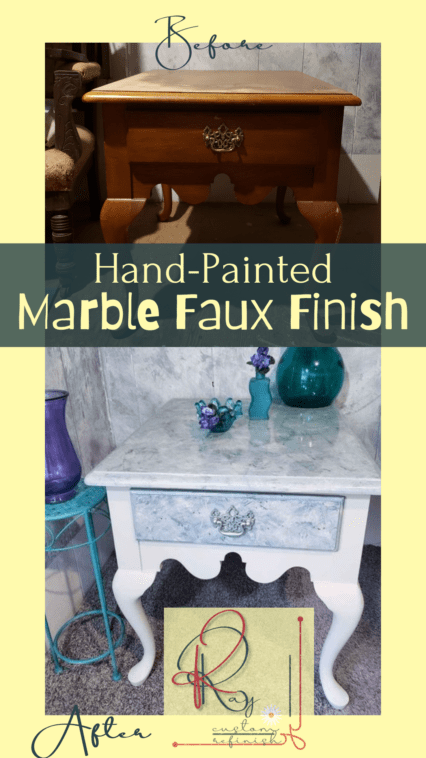
When my grandmother gave it to me during a move, it looked like this:

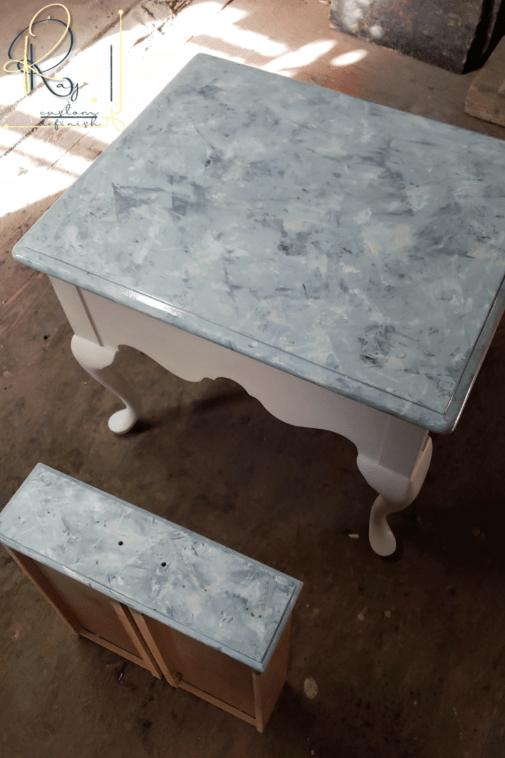
I had high hopes of keeping the top of this beautiful Queen Ann side table natural wood, but unfortunately, I sanded it down too far before realizing that it was a wood veneer.
Rookie mistake, I know, I know. I don’t know what I was thinking. So, strategy change!
As you can see by the photo above, I recently painted my work area walls in a textured gray finish. When Scott saw the walls he said it almost looked like marble. Super cool.
So that got me thinking about applying this finish to a tabletop with a high gloss finish. Whenever you see marble countertops they have a glossy look to them.
So this textured finish topped with gloss would have an uncanny resemblance to marble! Right?
Prepping The Queen Ann Side Table for a Marble Faux Finish
Step 1: Cleaning and Sanding
Cleaning
One of the most important steps when prepping wood furniture for paint is cleaning the entire surface well. There are many ways of doing this, and I’m sure whatever method you choose will work fine. But my personal preference is to wipe down the entire piece with a clean rag, warm water, and Dawn dish detergent.
Don’t soak the wood too much in case the original seal isn’t intact you don’t want the wood to absorb too much water. Just lightly dampen the rag with soapy water and scrub the entire surface.
After that dries, I wipe down the entire surface with Mineral Spirits also. This will be sure to remove any excess dirt, waxes, or oils leftover. Especially waxes. You don’t want any waxed areas popping up after the fact. The Mineral Spirits will take a bit to completely evaporate from the wood and may feel a little oily before it does. But once it has evaporated the surface will be perfect to begin work!
Sanding
For this piece, I chose to orbital sand the top down completely to remove the finish. For the rest of the piece, I used 120-grit sandpaper and lightly scuff sanded to prep it for priming. Since I had certain plans for the top and drawer front, I needed to make these surfaces as smooth as possible.
Step 2: Filling the Wood Grain
This Queen Ann Side Table is a vintage piece, and although the top was a wood veneer, the entire piece is still made from solid oak. This meant that the grain of the wood was very open and porous in some areas. This was fine for the body of the piece, but since I was going for a faux marble finish I needed the surface to be completely smooth to pull it off.
Not sure your piece’s wood type? Check out the Ultimate Guide to Identifying Wood Types in Furniture. Once you know the wood type, you’ll know the right way to finish it.
So I mixed up my favorite, Durham’s Water Putty, and spread it across the top of the piece, filling in all of the pores and uneven spaces. After that dried, I sanded it down with a 220 grit sanding sponge to remove any excess.
I actually had to do this twice, which you may find happens as well if you try this technique. Some areas may not fill completely on the first coat. Just do the exact same thing the 2nd time around and when you sand it smooth there shouldn’t be any uneven spaces left over.

Step 3: Primer Before Paint
I chose to primer this piece. I don’t always prime wood pieces as it isn’t always necessary. But I wanted to be sure–especially on the base and legs that I only scuff-sanded– that the paint would adhere properly.

Choosing a primer is always tough depending on the surface of your project. Luckily, I created a little cheat sheet for you so you can quickly look up the right primer for your project. Click Here to download your free printable “Which Primer Works Best” Chart.
I stuck with the trusty old Zinnser 1 2 3 Primer Plus for this project as there weren’t any stains, odors, or knots to cover up. Plus it’s water-based which makes for a much easier clean-up. I used to avoid primers for the sole reason of how awful cleaning shellac-based primers off of your brushes! Ugh!
After the primer dried for the necessary time, I sanded the top down to be as smooth as possible removing any brush marks or uneven areas. If the end result needs to be smooth as glass, you have to start from the very beginning and continue on each step after that creating a perfectly smooth surface.
Creating the Marble Faux Finish
Step 1: Spray the Base Coat
Now I am not usually a paint sprayer or spray paint kind of girl. I would much rather just use a paintbrush and do so on literally any other occasion. But since we’re trying to create something that looks like marble– one of the smoothest surfaces ever– brush marks cannot be a part of that.
Use either a paint sprayer or spray paint for your base coat. You won’t regret it.
I chose to spray paint the basecoat on the top and drawer front with an (apparently) old can of Valspar’s Chalky Finish Spray Paint in Gray. I guess I got it a while ago because I can’t seem to find it anywhere for sale online. At least not in spray paint form. It may have been discontinued, so luckily I only needed one coat for the base!
This is the closest product I could find, color-wise, to the one I used:
Step 2: Prepare Your Paint Pallette
I’m sure that this technique can be successful with many different color choices, but you do have to be careful with what you choose. The base color that I sprayed on was a gray/green color, very similar to some marble.
The base color that you choose will be pretty prominent in the piece as we’ll only be adding streaks, swirls, and random markings on top of it. Rather than completely covering the base color like with a lot of other techniques.
So I chose to use a very light grey/white color, a bright white, and a black. I used a piece of cardboard as my “palette” and basically had a small spot of bright white, a small spot of grey/white, and on the other edge a small spot of black. Leaving a decent space between the bright white and black on the cardboard.
Then I scooped a bit of the bright white and the black towards each other in that empty space. Mix them together into a darker gray color. I now had 4 separate colors on my palette, with room to possibly create a lighter grey or darker gray if needed.
If you chose to use colors completely different than these, you basically just want different shades of whatever your main color ends up being. So you’ll probably want white on your palette no matter what to create a lighter color. As well as black to create your darker color. And then 2 mid-tones to blend in with as well.
Step 3: Prepare Your Application Tools
Really this isn’t much of a step, because the only “application tools” you need are cardboard and rags. You should at least cut the cardboard up into small pieces, as you’ll see in the video below. I find it easier if the piece is large enough to fold, and then use the folded edge to dip into the paint and then onto the surface of the piece.
As for the rags, really you can use whatever you’d like. Paper towels, shop rags, cut up old t-shirts, you name it. Something that will kind of “crumple up” so that you can dip the crumpled up edge into the paint and then onto the surface of the piece.
I also used a small paintbrush lightly dampened with water to blend the colors together towards the end and create a cohesive look.
Step 4: Apply Your Paint
There’s really not an exact method for creating this look that I can lay out step-by-step for you here but I will try my best.
Using your cardboard applicator first, lightly dip into the paint, lightly dab on a paper towel to remove any excess, and then dab onto the surface of the piece in random spots. Do one color at a time, but use the same piece of cardboard for each color. You really don’t need a lot of paint on the cardboard to transfer it to your surface.
I stuck with the bright white, light grey white, and the mixed darker gray here. Save any black for the end of the process.
Then take a dry cardboard piece and swipe across the lines you just created to create texture. As you’ll see in the video, I went back and forth a few times between swiping and dabbing the cardboard.
Just do what feels right for your piece, you’ll know when it’s time to add some more variation in shapes/colors.
Next, do the same thing with your crumpled rag. Dip it lightly into the paint, then dab off any excess, and dab onto the surface of the paint in random spots. For this, I used only the bright white and a very tiny amount of black to add some depth.
Don’t worry about overlapping other painted spots, but try to fill in any spots that don’t have color on them. You may also want a rag lightly dampened with water only for lightly swiping across the surface as well to blend or spread some more painted spots around.
You really just need to keep at it until it suddenly clicks and voila you’re not looking at just a painted piece of wood anymore!
The video below shows my entire painted process of creating the faux marble top. The actual process took about 30 minutes so I did trim speed the video up a bit to save you some time!
You can see at the end of the video that I used a small round paintbrush to dab a few more spots of paint on, and then dry brushed randomly over the entire surface until it finally looked perfect to me!
Step 5: High Gloss Finish
This table required spray-on clear coats for that high gloss finish, which I explain below. If you’re looking for help with brush-on Polyurethane clear coats (water and oil-based), check out my post on Applying Polyurethane Perectly.
Seal Coat
Finally, after letting the multiple paints dry for at least 24 hours, you can create the high gloss finish that will have people wondering whether the piece is actually marble or not!
First off we need to seal the paint where it is to make sure that nothing blends together more than we want it to. For this, I used this:
It dries crystal clear as advertised, and stops any of the colors from running together or changing at all on you. It adds zero gloss to the surface though so we need to coat it with a high gloss glaze for the marble look we’re going for.
Before applying the gloss, lightly sand with 320+ grit to remove any bubbles, and wipe with a tack cloth to remove any dust.
High Gloss Coat
Make sure that your work area is clean and completely dust-free before attempting to spray the high-gloss glaze.
Also, plan to leave the room immediately after applying it, and stay away for at least 6 hours (if possible). If that’s out of the question, at least try to stay away for an hour or so or you will get dust particles in your finish. No matter how clean your work area is!
This is the gloss spray I used on the Queen Ann Side Table:
It is a triple-thick, crystal clear, high gloss clear glaze and It works amazingly well. Once you’ve gotten your work area prepped and are prepared to leave the room for the day, you can start spraying!
Obviously, read the instructions on the back of the can for getting your spray paint ready. Do not shake your can until you’ve read the directions.
Then you can begin spraying.
This is a triple-thick clear glaze, and is not applied the same as regular spray paints.
1 coat of this is equal to about 3 coats of regular spray paint. Applying the coats very thin and light like with regular spray paint isn’t necessary here. You want to apply a wet-looking layer right away, instead of misting it on slowly. This works great for spray flat surfaces like tabletops but can become tricky when you’re working on vertical surface areas or curves.
Luckily, horizontal/flat surfaces for this one! Spray each line starting at the top of the surface and working your way down, slightly overlapping the row above on each line.
If it looks like it’s puddling or you see anything that might be lighter than others, DON’T touch it! This stuff settles in nicely if you just spray it and forget it. Anything after the fact can be sanded and resprayed.

Just a fun tidbit, I may have gotten so excited about how beautiful the gloss looked that I was dying to take staged photos of it for you guys. So I may have neglected to wait over an hour before putting vases and flowers, et cetera on top of it.
As you may have already guessed, this meant that I had to completely redo the topcoat. Or at least respray the final coat in order to fill in all of the divots and scratches I created trying to take pictures. Whoops! Not the smartest move on my part, but sometimes the excitement just gets the best of you!
The moral of that story is to make sure you wait the recommended dry time before putting anything on top of the surface you just sprayed.
If you’ve made a silly mistake like mine applying polyurethane, lacquer, shellac, or varnish, find out how to fix the damage in my post Identifying and Repairing Clear Coats.
The Base and Cabriole Legs of the Queen Ann Side Table
I chose to high gloss only the tabletop and drawer front to complete the “Marble Faux Finish” effect. The base and legs were primed and painted an off-white color from Valspar. (It was a sample at Lowe’s, I just love them!)
Some MudPaint clear wax to seal in the paint, complete the look, and voila!
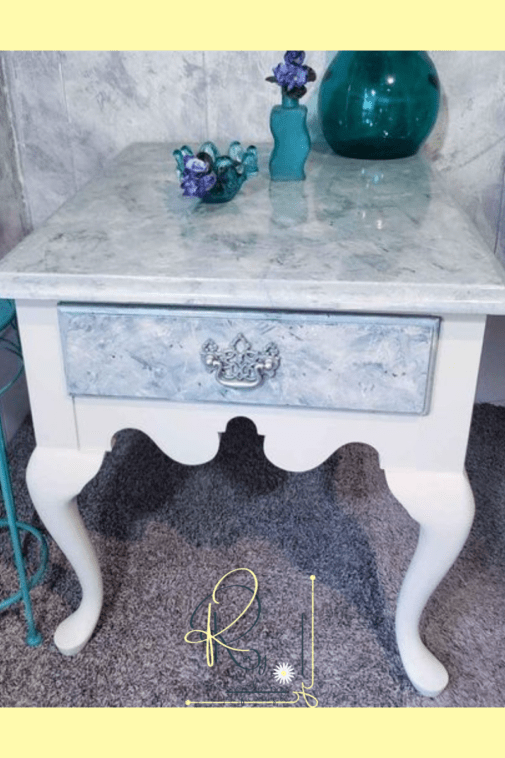
The Queen Ann Side Table with Marble Faux Finish that could… maybe.. not be Faux? 🙂


And there we have it! The Queen Ann Side Table with Marble Faux Finish is complete, and I am in love! What do you think? Does it look like real marble? Either way, it’s completely one-of-a-kind and that’s one of the most important aspects of furniture refinishing for me.
The Queen Ann Side Table is still available in my shop as of today, but I can tell already that it won’t be there for long, so if you’re interested, be sure to scoop it up while you still can!
Be sure to check out the DIY Resources page filled with free downloadable cheat sheets, infographics, and more on staining wood, sanding wood, identifying wood, and much more!
Next week, I’ll show you how to decoupage a glass cabinet door. I’m talking, the glass, the wood, and all! When I show you all my Corner China Cabinet Makeover. Be sure to check back, or sign up below to have it sent straight to your email!

Thanks for reading!
Until Next Time,
KRay


